Friday, May 15, 2009

How to Journal About Your Crochet Ideas

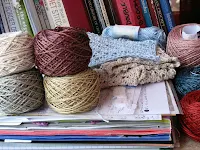
Can you find my notebook in this project pile?

We crocheters are a creative bunch. With all the fresh yarn colors, new crochet hooks, free crochet patterns, and exciting crochet fashions on the runways, some days my problem is too much inspiration! A crochet notebook really helps. 

Do you already record your crochet inspirations somehow? If so, you know that there's more than one way to go about it. 

I used to use sticky notes of all sizes and then throw them into folders. 
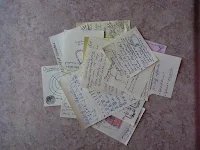
I liked this because each design idea remained independent and
 recombinable; they were also easy to jot down anywhere at any moment. I still have sticky note pads in every purse, car, and throughout the house so that no inspiration is ever forgotten. 

The sticky note system is not ideal. I didn't like it because the ideas were less likely to evolve. They tended to remain just sparks, or seeds still needing to be planted. (Of concern to professional designers: no built-in intellectual property protection!)

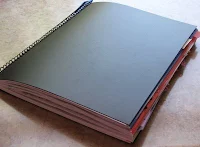
I love my 8.5" x 11" thick spiral-bound blank notebook by Miquel Rius. I found it at the local Barnes & Noble. Its durable hard plastic looks good and protects well. The pages have faint graph paper lines. 

Here's my basic system:
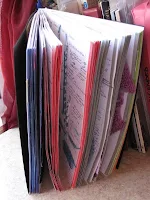
  • I number each page consecutively in ink.
  • I reserve the 2 back pages for indexing by page number. 
  • Each entry is in ink, dated, and initialed by me. 
  • If I had to jot down something on a sticky note or scrap paper, it gets firmly taped into the notebook as a signed and dated entry. 
  • No pages are ever ripped out.
I know what you're thinking: seems a bit formal. Hold that thought.

Other things that go into this notebook: 
  • sketches, diagrams
  • inspiring clippings
  • samples of crochet stitches and patterns 
Not all of my swatching fits into a bound book like this but it's the ideal place to keep my thread crochet lace pieces. For sketches I've learned to keep colored pens nearby. Some ideas are just plain better drawn than written. Years later I especially enjoy looking at my quick sketches, even those that didn't seem like much at the time. 

At first this was a big change and did seem a bit formal to me, but it's an easy habit and well worth it. It's a fertile garden where I can watch the seeds that I've planted grow over time. The entry dating turns it into a lovely memory book. I love just paging through this notebook. A big bonus is that all of these steps help to protect my ideas as the intellectual property that they are.

Sometimes while crocheting I jot down into this notebook seemingly random thoughts or opinions I have that are in any way related to crochet--maybe about the yarn or hook or pattern or color I'm using. Later, these thoughts become useful. 

It's good for crocheters to recognize that what we naturally do generates intellectual property! Below are some links to descriptions of how design notebooks are used in other fields. I hope you are inspired to record your crochet stitches, experiments, observations, and daydreams.

I love seeing how Paul Hughes thinks in diagrams and sketches
College-level guidelines for creating design process notebooks, including graded evaluations, here and here

Wednesday, May 13, 2009

Using Crochet Jewelry with Wire Free Patterns

I've been thinking about how to crochet wire jewelry since posting one of my free patterns 5 days ago. Within the first 36 hours alone it earned over 70 "hearts" in Ravelry (was favorited by over 70 people), and this brought a big smile to my weekend! 

Yet the bracelet did not become a new project for these Ravelers. 

Handmade beaded wire jewelry crochet patterns use materials that are not available everywhere. I shop for beads in 5 local stores and every store has a very different bead selection. Some craft stores don't carry nice jewelry wire in different gauges. (For this reason, jewelry wire crochet kits are probably ideal.) 

As a crochet designer, I know that yarn substituting is not always easy. Substituting crochet jewelry wire might be even trickier. It was for me when I made a second Love Knot Embracelet yesterday! Here's what I learned:

Lesson #1: 
There's a good chance that the wire gauge you want is the one that you don't have.
I wanted to use pure silver wire for my 2nd bracelet but I only have fine gauges (30-gauge or "30ga" and 26ga), no thick 22ga. I can't just go out and buy pure silver wire locally, only online.

Lesson #2: You can make your own thick gauge wire if you have a thinner gauge on hand.
I cut 3 pieces of 26ga silver wire, all 26 inches long, and twisted them together into one thicker piece.

Lesson #3: Wires of the same gauge, different metal, and sometimes different brand, can behave differently.
Pure silver (a.k.a. "fine silver," more pure than sterling) is softer, more pliant than the copper I used for the first bracelet. Also, some copper wire has an invisible coating, such as the 22ga I bought from Radio Shack. I think if I'd twisted 4 strands of 26ga silver together instead of 3, the result would be closer to the stiffness of my 22ga copper wire.

Lesson #4: Big round beads will require a longer 
bracelet than flatter, streamlined beads.
Laid flat, the two bracelets are the same finished length. When worn, the bulkier red one fits just right and the flatter blue one is just too big.

Wire is a fascinating crochet "yarn" that makes pretty beads even prettier. More tips on how to crochet wire are found in one of my 2006 free patterns for crocheted doilies: Coffee Hotplate Doily.

Friday, May 08, 2009

Free Crochet Pattern for Mothers Day

I awoke from a dream about crochet love knots (a.k.a. "Solomon's knots") covering two sides of a string of beads like airy cages or nets. As I went about my day I planned out the crochet yarn and beads for the experiment: wire would make the love knots stand out from the beads the most. I could use any beads I liked, even big heavy beads with little holes.

Here is today's result, which only took about a hour at most. I describe below how to crochet it, in case you wish to try it with whatever beads and wire or string you have on hand. It would make a nice Mothers Day gift. If your mother is a crocheter too, she would appreciate how the love knot stitch in wire has a fancy new look wrapped around special beads.

In appreciation of mothers everywhere, here is my....
Love Knot Embracelet
copyright Vashti Braha, all rights reserved
For this project you'll need to know how to crochet a love knot. (To learn how, google for a how-to video, such as this one. Try it first with smooth light-colored yarn before you try wire.)

Materials (and substitution tips)

  • 26 gauge wire (I used a copper one from a craft store. You can find it in many colors. If 26 gauge is not available, I recommend 28 gauge, which is a little finer.)
  • A 25-inch long piece of 22 gauge wire (I used a spool of copper from Radio Shack! 22 gauge is too thick to crochet but still easy to cut and bend. You can try using 20 of 24 gauge.)
  • Wire cutters (I used kitchen shears from the dollar store)
  • One steel crochet hook in the size range of #3 to #0 (whatever works best for you. Some folks crochet wire very loosely.)
  • Any medium-large-sized beads (I bought mine at Michaels.)
  • A hammer or pliers, for flattening and compressing the stitches of the hook and loop closure. (Or use a ready made bracelet closure of your choice.)
1. Loosely fold the 25-inch piece of wire in half so that the fold is a round loop. Do not string on the beads.

2. With the thinner wire, make a slip knot, place on hook, single crochet (sc) into the loop of the thicker wire piece so that the stitch is wrapped around the thick wire. *Make a love knot that is approx. one-quarter inch longer than the bead you're using, slide a bead onto both ends of the thicker wire and slide up so that it's snug against the sc, then sc around the thick wire on the other side of the bead. Repeat from * to * until 2.5 inches of thick wire remain.


If this is your first time trying wire crochet, don't worry about how your stitches look! Try to avoid crumpling up your stitches too much as you go, but a certain amount of crumpling can't be helped when you crochet with wire. It looks unsightly but you can spiff it up later. Notice in this photo that like ugly ducklings, the love knots look nothing like the swans they will become. (Actually, I was tempted to try leaving them as is, only twisted a bit. See what you think.)

3. Sc over the remaining thick wire ends, leaving one-half inch unworked. Then flatten the sc's a bit and fold that strip of sc's in half. Flatten and compress it. Wind the unworked thick wire ends around the sc strip and hide the ends so that they don't snag or poke when bracelet is worn.

4. Fold the sc strip in half again, loosely, to create a hook for the clasp. I like to fold it around the shaft of my steel crochet hook; then compress the stitches some more. (See first photo.)

5. Continue working along the other side of the thick wire: *make a love knot of the same size as the others, sc around the thick wire on the other side of the next bead.* You can scrunch the beads apart so that you can fit your sc in there. Continue from * to * until you reach the thick wire loop end.
6. Scrunch together the beads so that about one inch of the thick wire loop is free of stitches. Sc around this loop until it is covered. Fasten off and hide the ends. Flatten and compress the sc's.

7. Now you can coax your love knot strands into a pretty look. Each love knot has 3 strands, so each bead is enrobed with 6 floaty wire strands.

For more photos and comments, please look for this project in Ravelry. If you make your own version, I hope you'll upload a photo and let me know!

Saturday, April 18, 2009

New Handbag Pattern in a New e-Book


I'm pleased to announce that my designing friends have done it again! 


My "Half Double Half Circle Handbag" crochet pattern is now available in volume three of our downloadable Strapped for Bags series.

Like our three other e-books, it is 100% designer-produced, and that's why we're known as.... Straight from Today's Designers. So many of us had a bag pattern to contribute that we divided them among 3 volumes.

About my pattern: 
What you see is the result of two goals. The first was to revel in the built-in drama of a self-striping yarn like the Noro Kureyon you see here. It's an easy stitch pattern of "half doubles" (hdc in the US, htr in the UK and Oz) so I zipped along in suspense as each new color bloomed. Suddenly I had a handbag. 

I love the fabric of it so much that a close up of it decorates my Twitter page background. I display the bag at home for daily eye candy.

My other inspiration has been a current fashion trend for garment and handbag construction in which the grain of the fabric is spotlighted as the primary design element. Crochet is great for this because you can easily emphasize row direction, as with this bag. 

This fashion trend inspired me see what the distinctive fabric grain would look like in a solid-colored yarn, and in cotton, which can result in a very different fabric from a wool yarn.

All of our books have Ravelry pages, where a wealth of additional information is available. Here's the page for my bag; the book page showing all seven designs; project page of the multicolored version of my bag is here and the solid cotton version is here. If you're not in Ravelry, check out my new crochet design photo galleries that I'm building in Flickr.

Wednesday, March 11, 2009

Designer's Pledge

I stand with Annie.

Friends, some of you may have noticed that over time, appearances of my new designs have dwindled. Something happened to my designing life last year: four years of selling all rights to my designs caught up with me and I couldn't bear it anymore. At first I wondered if I should stop designing altogether (horrors!). I actually tried that, but found out that I couldn't stop designing; I just stopped submitting proposals to print publishers.

Annie's pledge* is an easy one for me to make because I naturally made this pledge with myself in 2008, just so that I could enjoy designing again. I have so many fun new options for sharing my designs with you, so watch this blog!

*"Today I pledge that henceforth, I will only sign contracts that allow me the freedom of determining what happens to my intellectual property after the initial publication." Annie Modesitt's post is excellent reading for designers and their friends.

Tuesday, February 24, 2009

Crochet on the Runway for Fall 2009: The Links

Here are links that relate to last night's fashion crochet podcast.
(You can download it if you missed it; also scroll down to Comments, esp. if you are Eleanor in FL!)
The dress pictured here is by Wasson for RVCA and is a great example of the inky black crocheted lace looks for Fall 2009 (source)

Check out Aquascutum's black Irish crochet lace stockings here. Another designer featuring black crochet lace textures for fall is A 
Detacher, and for 2009 Spring and Resort collections, see Just Cavalli and Diane von Furstenberg. You can find photos of these and many more crochet looks in this slideshow --Catherine Malandrino, Ports 1961, Nanette Lepore, Douglas Hannant, and more.
I also mentioned seeing freeform knit and crochet on the runway for 2009. I found both the more solid, classic scrumbling look (see Rodarte miniskirts) as well as in-your-face freeform crochet lace, for example Kenzo (Spring collection, see dress also; photo source). 

Very exciting! Of course I instantly thought of Myra Wood's new book--you're ahead of the runway designers, Myra! Maybe you inspired them or their contract crocheters?

I'm also swooning over Sonia Rykiel's deep-v black and white diagonal gown with colorwork virtuosity, and Alberta Feretti's pewter skirt of crocheted pineapples worn over the beautiful silver satin dress. (Silver/gray is my favorite neutral.) The traditional pineapple stitch pattern looks modern and chic; same with the examples of classic Irish crochet lace draped all over, sometimes in huge swaths reminding me of crochet's 
heyday with Queen Victoria. That's Aquascutum's coat you see here. Here's a classic gold crochet motif cardi with fresh styling by Dries van Noten. Don't miss Douglas Hannant's Spring '09 traditional yet over-the-top dress.

I mentioned PPQ's geometric crochet motif epaulets, but neglected to mention the accompanying ruffled crochet shorts!(same pic)

Last but not least, I tried to describe the unusual must-see crochet-covered ring embellishments that On Aura Tout Vu used on sunglasses and clothing. You just need to see for yourself. This blog seems to be the original source for the photos that I saw on other blogs.

Sunday, February 22, 2009

Want to Talk Fashion and Crochet?


That's the topic I'll be discussing with Mary Beth Temple for her Getting Loopy podcast this Monday evening (you can download it if you missed it). Please feel free to call in any questions or comments you have during the show at this number: 646-915-8371. It is deliciously fun to join the chat room also, which is open during the podcasts every Monday. 

You're welcome to email me with any questions or comments: vashtiramaATgmail.com (replace 'AT' with @). And if you miss the live show, you can do what hundreds and hundreds of listeners do, they download the podcast from the archives.

I love talking with Mary Beth--years ago our very first phone convo was 4 or so hours long :-) -- and I love fashion and crochet. 

Tuesday, February 03, 2009

Please Help Indie Designers: Survey

Click
Here to take survey

When you have a moment, please add your comments to a survey created by Mary Beth Temple. It's short--it took me 2 or 3 minutes--and at the end you can also enter her contest on her next Getting Loopy podcast. The lucky winner receives a cone of the new LB Collection Wool Stainless Steel yarn in a pretty color.
Thank you! And now, back to my task at hand: rounding up years of my WIP's, PIG's, and FO's* to photograph and post on Ravelry. (Or, frog and recycle.)

*WIP (work in progress), PIG (project in grocery bag), FO (finished object), frog (to "rip-it" out).

Thursday, January 29, 2009

Free Pattern: Draft Snake

If you landed here from The Daily Green, welcome! I hope all of my readers enjoy crocheting this draft snake as much as I did.  If you're wondering what to do with leftover crochet yarns or single skeins of pretties, this is your lucky day. This free 'n' easy pattern uses basic crochet stitches, yarns you already own, and is sure to lower your heating bills!

To get started, round up the yarns you'd like to use. (Yarn scraps should be at least 36 inches long.) If a yarn is thin, use it along with one or two other yarns. Furry, lumpy, and feathery yarns are fantastic for draft snakes because the extra texture blocks drafts under the door the best. If you use highly textured yarns like I did, crochet them along with a coordinating color of a standard smooth worsted weight yarn. The smooth yarn will make it easier for you to see where to place your stitches.

If you use all smooth yarns--for example, 3 worsted weight strands of Red Heart or Simply Soft acrylic held together--the snake will have a cool woven basket look instead. It will also be more stiff.

I glued big flat-backed acrylic gems for the eyes, and with thin red crochet thread I crocheted a forked tongue, which required heavy stiffener. For this pattern though, do yourself a favor: cut a piece of red felt into a long snake tongue shape and call it a day. In keeping with the snake's stylin' bling I edged the snake eyes with glittery gold 3-D fabric paint, and drew a gold vein on the tongue.

Scrappy Draft Snake, the Pattern
Please help me preserve Scrappy's copyright by referring friends to this DesigningVashti 1/29/09 blog entry instead of distributing your own copies. This pattern is intended for crocheters over the age of 12 who take full responsibility for using safe materials. Thanks!

Supplies:
  • Your own special stash of yarns, some with high texture for EDP (enhanced draft protection).
  • Size M/#13/9mm crochet hook or best hook size for you. The goal is a comfortably tight gauge; as long as the stuffing won't show, you're using the right hook for you and your yarns.
  • A stitch marker
  • Stuffing
  • Fabric scrap (such as felt) cut into snake tongue shape
  • Yarn needle that is sharp enough to sew through fabric scrap
  • Flat-backed gems or googly eyes, and fabric glue for them (if children in the home are under 3, securely sewn-on eyes instead of glued are safer.)
Abbreviations:
ch = chain
sc = single crochet
sl st = slip stitch
st, sts = stitch, stitches
rep = repeat
rnd = round
RS, WS = right side, wrong side

Begin Snake at its tail end: Ch 2.
Rnd 1: work 6 sc into 2nd ch from hook (or use the method of your choice for crocheting in the rnd with a closed center hole). Place st marker in 6th sc. Rnds will be worked in a spiral without joining rnds and without turning after each rnd. Move st marker to the last st of each rnd so that you can count your rnds. The backs of the sts will be the outside of the snake (i.e. the RS) because high texture falls to the backs of crochet sts.
Rnd 2: (2 sc in the next sc, sc in the next sc) around, move marker: 9 sc.
Rnd 3: Sc in each sc around, move marker: 9 sc.
Rnd 4: (2 sc in next sc, sc in each of next 2 sc) around, move marker: 12 sc.
Rnd 5: Rep rnd 3. 
Rnd 6: (2 sc in next sc, sc in each of next 3 sc) around, move marker: 15 sc.
Rnd 7: Rep rnd 3.
Rnd 8: (2 sc in next sc, sc in each of next 4 sc) around, move marker: 18 sc.
Rnd 9: Rep rnd 3. Snake tail is complete.

Snake Body and Head: Rep rnd 3 until snake is as long as desired; I made mine to fit a 35" doorway snugly. Fasten off with a yarn tail about 12 inches long. Snake opening is the mouth.

Stuff snake.

Sew mouth closed: with yarn needle and yarn tail, sew snake mouth tightly closed around tongue so that seam creates a rounded snake's mouth. 

Glue (or sew) eyes securely.

Tuesday, January 20, 2009

Crochet and the Obamas

I'm watching televised coverage of the U.S. Presidential Inauguration Day. As the cameras scan the massive crowd, I notice crochet-textured hats and scarves. Occasionally I can identify actual crochet stitches, as in the case of the gentleman who salutes throughout President Obama's inaugural speech: he wears a heathery purple hat crocheted of stacked shells that changes to plain-textured stitches toward the crown. Someone else wears a cream-colored hat with widely-spaced vertical ribs of post stitches.

Like many people I've been enjoying First Lady Michelle Obama's fresh and adventurous fashion style and if today's inaugural dress is a signal, it is exciting for me as a crochet designer.

Mrs. Obama wears a sumptuous sheath dress and matching coat ensemble designed by Isabel Toledo. I thrill to the rich texture of the fabric, which is reminiscent of fine crocheted lace over a silk satin lining. It speaks volumes in subliminal texture-speak.

Crochet designing trains the eye to read textures of fabrics, not just their colors or fiber content or cut and shaping. This is because texture is one of the central defining elements of every crochet stitch; one can either design with it or around it.

I'm seeing more rich textures displayed by the Obamas and their extended family than in the rest of the politicians and audience at large. The lady whom I believe is Mrs. Obama's mother wears a chunky-textured red hat and scarf set that has a handknit or crocheted look. Another possible relative wears a dark red furry scarf that reminds me of a knitting and crochet yarn like Bernat Boa or Sullivan's Sashay. President Obama himself chose a solid red necktie with distinctive texture as its design statement, rather than the matte satin ties I'm used to seeing politicians wear.

Textures like these communicate on an emotional level because they are visually warming and cozy; they look (ideally are, as all crochet is) handmade, which conveys loving care. They reassure because they are visual reminders of traditional and practical basic skills that are used to build something new and real, stitch by well-placed stitch.

So far (the day is still young), comments about the inaugural dress have to my mind been texture-deaf. It is extraordinary that a solid lace dress ensemble was chosen for this day; even more remarkable is what it communicates. In addition to the usual constructive and nurturing messages that texture can signal, Mrs. Obama wears the power lace of queens: an assertive depth of texture and play of light created by the painstaking work of artisans. (See Isabel Toledo's description.)

Taken all together, it manages to empower the wearer, the role, and the country simultaneously.

Thursday, January 01, 2009

2009 Crochet Manifesto

On this New Year's Day I'm reorganizing my "studio"--the creation zones in my house--and I thought I'd share with you a manifesto that I originally posted in my designing space on April 14, 2008. Doesn't "New Year's Day Manifesto" have a nice ring to it? (I also like how my 9 year old has always said New Year's "revolutions" instead of "resolutions".)

The original Manifesto, word for word, unedited:

Every stitch made is a treasure, not to have but as a record of an experience; it's the doing.

Each stitch is a microcosm; contains a world within; because it is the gestalt of a zillion choices and per-moment expression. It is a snapshot.

The goal is the experience of process. The process is the expression of is-ness. Expression of is-ness is creation.

Every kind of experience is possible; one is not more valuable than another*. Some may be more preferable, but perceptions change and the less-preferred can become the preferred. This is a mystery of creation/expression.

*Every kind of opinion is therefore also possible.

I remember that I was thinking about certain swatches I have lying around when I wrote that last one.
Time for me to go back to reorganizing. I was inspired to carpe diem and post this New Year's Manifesto after reading Kim Werker's post about the creative life.

Wednesday, December 24, 2008

Newly Published Jelly Yarn Projects for Children

I've been looking forward to the release of this fun book. Designing three of the projects was pure pleasure! The Flying Jelly Ring (and tambourine variation) went through multiple incarnations, requiring input from my son, a.k.a. Toy Tester "Bob". He cheerfully tested the glow-in-the-dark colors outside on clear summer evenings, for example. One of the prototypes now hangs off of his bedpost.

I'm proud of the Jellyfish purse because of the method I developed for covering a used CD with crochet, after much trial and error. The rainbow metallic look of a CD surface combined with Jelly Yarn gives the crochet a 21st century look that is irresistible to me! It's also very durable--I use the prototype often and it shows no wear. It was inspired by my son who loves jellyfish; Spongebob has something to do with it. (pictured at right is one of my son's electric jellyfish)

The book is chock-full of step-by-step photos and tips for every project, as I've come to expect from Kathleen Greco's books. In fact, as a designer I felt creatively freed by this because I knew that Kathleen would make sure that young readers could understand and enjoy each pattern from beginning to end.

Kathleen's snow globe project is a must-see!

I'm off to post a bit more on jelly over at my kid blog.

Thursday, November 13, 2008

Triple Crochet vs. the Granule Stitch

I've been having fun experimenting with a new kind of crochet stitch! It has a unique braided look and is easy to make. A few days ago Teresa posted a Youtube link to a video tutorial on "Triple Crochet" in the Crochet Partners forum. This is no ordinary Triple Crochet.
In the first photo, the 4 swatches on the right are my experiments. On the far left is a swatch of some rows of standard dc and tr for comparison. Click on each pic to enlarge.

Part of the fun of having stitch dictionaries and patterns designed by different crocheters is learning new stitches. Some stitches have more than one name, some have no name, and others are so standardized that they always go by the same name and are always made the same way.
The 2nd photo shows the back sides of the same 4 swatches in the first pic above. Note the long single strand along each stitch.

I think it's safe to say that most crocheters for most of crochet history begin what Americans call a triple or treble, and what Brits and Aussies call a double treble, by yarning over the hook twice before placing the hook into the stitch to be worked, and then working the loops off of the hook in twos. Check out the how-to video at Nexstitch for this stitch. Any "learn to crochet" section in books or magazines shows the same standard way and standard name: Triple/Treble (US, often abbrev. "tr") or Double Treble (UK "dtr"). (The UK Treble is equivalent to the US Double.)

The "Triple Crochet" taught in the Youtube video has nothing in common with the standard tr. For example, you begin the stitch with no yarn-overs as if to make a Single Crochet (US sc/UK dc), and one loop is worked off twice, which creates 2 chain stitches, before working off the last two loops at once. Instead, this stitch is similar to the "single crochet picot stitch" that forms the basis of what is called "Granule Stitch" in Donna Kooler's Encyclopedia of Crochet (p. 139) and in the Harmony Guides vol 6, p. 36. It also appears under the name "Bead Stitch" in the 365 Crochet Stitches a Year Perpetual Calendar for May 22. In all of these cases, however, you make 3 chains, not 2, before working off the final two loops together. (By the way, the same Granule Stitch appears on p. 75 of the reprint of the Harmony Guides ed. by Erika Knight called Basic Crochet Stitches, but the swatch is so wrong!)

The biggest difference is what gives the Granule Stitch its picot or beadlike look. You chain 1 to begin the row and work a sc in the stitch before and after the "sc picot stitch" and this causes the 3-chain sc sts to scrunch over and make cute bulges.
In this 3rd photo you can see my attempt at a Tunisian version--this is the front view. I like it!

The new "Triple Crochet" stitch in the Youtube video stands straight and tall, no bulging. Something that doesn't show up in the video is the strand of yarn running vertically along the length of each stitch. (It reminds me of the lone strand alongside bullion sts.) I've provided photos of both front and back views of my swatches so that you can see what I mean; the strands tend to recede to the back of the stitches.
To keep this strand from limiting the height of this chained stitch you must make the first chain loosely. Watch how loose the tension is in the video while the stitches are made, especially at the foot of each stitch. When you pull the finished stitches up to their full height, that lone strand tugs the "feet" of the stitch tighter.
Photo #4: back view of my Tunisian version of the stitch in which you can see the long strand of each stitch.

I wish to thank Elissa (hope I spelled that right), the person in the video who opened my crochet world to a new kind of stitch!
I'd like to suggest that we call it something else. The "Extended Single Crochet" (esc) is the same except that it has only 1 chain added to the sc before completing it. So by adding 2 chains the way Elissa does it, it would make sense to call this stitch a tall esc, perhaps abbreviated "tesc". The stitch looks braided to me, so for a more poetic name I think of my Tunisian variation as "Tunisian Braid Stitch".

Sunday, September 28, 2008

Tunisian Panels: The Marco Jacket


This one's fresh off the hook because I wanted to wear it to the Portland CGOA conference two weeks ago. It's really 4 experiments in one!

1. I used an obscure stash yarn that worked out great for tunisian crochet. It's Austermann Marco Stretch in "Winterberry" (a warm heathered rose). I've never used a bulky wool with a lot of lycra in it for a sweater so I didn't know what kind of drape I could expect, and whether I'd even be able to block it to my measurements. (Not much info on the 'net from users of this yarn, not even in Ravelry.)

2. The yarn is discontinued so I had a finite amount: would 10 skeins be enough for a jacket? To be on the safe side I went with cropped and shaped sleeves, cropped length, and minimal collar and front overlap. The yarn seemed sporty to me so I pictured a zip-front hoodie style, and would add pockets and a hood with leftover yarn. It ended up reminiscent of a boxy Chanel jacket style when I edged it. That's Yvette trying it on backstage after the conference fashion show.

3. The yarn was like felted spaghetti to work with and looked lumpy in every crochet swatch I tried except tunisian simple stitch (tss). The tunisian fabric came out stretchy, smooth, and soft & spongy enough for my kitten! I was not in the mood for long or cabled tunisian hooks, so....panels, right? I haven't seen many sweaters done this way lately. Making the panels was great fun, but how did I want to join them? I decided to make the seams a decorative element, so more swatching! (But check out ARNie's join-as-you-go tutorial) Correction added 9/30: See ARNie's comment on this entry; this link is part of Cindy's Crochet Pages. Great job Cindy! Thank you.

4. The last experiment concerned shaping. I wanted to do it all--tapered set-in sleeves, back neck drop, shoulder slope, waist. I knew it would help streamline the yarn's bouncy bulk, but this amount of shaping and shortrowing in tunisian was new to me. Using a 12mm hook and big yarn made it fun because some shaping was accomplished with merely adding or subtracting a few jumbo stitches.

I'm very pleased with the results, although I wish the yarn blocked better. There's a pic of me wearing it on Margaret's blog--scroll down to the 2nd photo. At the conference people especially liked the contrasting stitch textures, and some thought the seams were cables :-)

I would definitely construct a garment with tunisian panels again. I created a way to make "panel maps" in Garment Designer, which should simplify writing the pattern for many sizes. (Here's a hazy pic of the map I worked from.)

I had about 1 ball's worth of yarn left over. I paid $3.19/ball for this yarn about 4 years ago at http://www.elann.com/, so not bad for a $30 sweater, huh?

Sunday, September 21, 2008

The Ins and Outs of INTERMESHING

I took Margaret Hubert's class on Intermeshing at the CGOA regional conference held in Portland, Oregon last week. Intermeshing is like crocheting two separate pieces of fabric, usually simple filet (chain 1, double crochet in the next double crochet), but you are interweaving them as you work a row of one piece and then the other, so it's a whole new way of experiencing filet crochet. The possible variations are infinite!

Although I had learned how to do this intriguing technique months ago thanks to Bonnie Pierce's downloads (scroll halfway down) and James Walters' excellent material generously made available via the internet, intermeshing is a type of crochet that is also exciting in a class setting. When I saw that Margaret was offering this class, I knew I had to be there.

I brought enough yarn for two very different swatches: one is that new Glow in the Dark yarn (white) by Bernat paired with a ball of blue discontinued Debbie Bliss yarn; my son loves how brightly the Bernat yarn glows in the dark, so I plan to turn this swatch into a small pillow that doubles as a nightlight. This yarn glows all night long! It glows brighter and less green than my camera captured here.

Margaret's class project was a simple bag and that's what I'll turn my second swatch into, so I brought colors for me: a deep rich red chenille (discontinued Reynolds Paris) paired with charcoal Lion Brand Cotton Ease. (see first photo, above.)

Intermeshing requires a certain kind of focus at first. I find that after awhile I can get into a comfortable rhythm, but until then, the logic of it is tricky for me--especially the beginning and ending of rows. Can you spot all the errors? Keep in mind that the edge is meant to end with a solid vertical bar of blue....

Below is my first swatch from months ago, in size 10 threads, turned into a wrist cuff. I was curious how it would look to pair a variegated thread (Manuela) with a solid neutral color (Cebelia). I wear it often because it goes great with jeans, but as a jewelry design I think it would have more punch if both colors were solid instead of variegated. Photos of it "in action" can be seen here.
I recommend Margaret's class to anyone interested in learning intermeshing. She brought some inspiring samples and her class handout is first-rate. I haven't shown any variations here, but Margaret had an afghan with a combination of intermeshing variations. Check out her blog entries about the class (scroll down to Sept. 16 and Aug. 3).

Update: see also this site about "Double Filet" as intermeshing is called in the UK (thank you, nic): http://www.craftgroupsevenoaks.co.uk/dfCrochet.php
In the US for 2010, Susan Lowman will be teaching a class on this technique at CGOA's Chain Link conference (July, Manchester NH).

Sunday, August 24, 2008

The Merits of Owning 10-Skein Bags

Today in the Crochet Partners forum someone wondered what would be a good amount of yarn to buy if one sees it for a good price but one doesn't have a project in mind. What a great question! Below is my reply, with some additional thoughts.
(Pictured: a delicious 10-ball box of Coats Opera #5 thread)

If I can, I'll buy the number of skeins it takes to make a full mill "bag", if I can get the yarn in its original bag. Yarn companies ship most yarns divided neatly into clear bags. Many of the yarns sold in local yarn shops (LYS) come in 10-skein bags. Some yarns carried in craft chains might be shipped in 3-skein bags or 6-skein bags. I've found that if I buy a 10-skein bag at a yarn shop or online, there are lots of benefits:

- If I change my mind down the road about using the yarn, it's very easy to sell a full 10-skein bag (in its original bag) on the internet, even long after it has been discontinued. Occasionally a LYS will take it back for store credit.

- An intact bag of 10 makes a great gift for a yarn lover!
(10-ball bag of Rowan Linen Drape at left; click pic to see the official label on the bag)

- It's easy to figure out in your head the total yards you have: 10 x yards in each ball = a good amount for a sweater (note that depending on the design, there might only be enough yarn for mid-length sleeves.) So, say each ball has 125 yards, you know that a 10-ball bag gives you 1250 yards total. Ten skeins gives me enough to experiment with some and still have enough to make a summer top, shrug, wrap, hat and scarf, tote, throw pillows, multiple gifts, or a matching set of something.

- It comes home in its own storage bag! 10-ball bags stack on each other well and slide under beds perfectly. The balls stay new-looking because they don't tumble around; instead they're packed neatly like sardines in their mill bags. I'm making two sweaters right now, both with stash yarns that I bought in 10-ball bags about 5 years ago. The yarn is so fresh it's like I bought it yesterday!

- The dye lot is automatically the same for each ball.

- It helps the LYS because they're not left with stray skeins of a dye lot. By the way, if you want to special order a yarn from a LYS, ordering 10 balls of it makes it very easy for the shop.

- Given these benefits, if you find 10-ball bags of a discontinued yarn, the closeout price is a true bargain. Consider my latest acquisition: Artful Yarns Fable, $55 for the bag. That's $5.50 per ball of a premium pima cotton & silk blend, all one dye lot, pristine condition; 184yards ea. = 1840 yds total!

Many of these benefits might also be true for the 3-ball and 6-ball bags at chain stores.
The Caron Pizazz at right came in 3-ball bags.

Monday, August 11, 2008

Podcast Tonight! Join Me!

My good friend Mary Beth Temple created the Getting Loopy call-in podcast show a few months ago and has already built up a valuable archive of shows that you can listen to anytime. In my previous post I mentioned how she ramped everything up a notch by podcasting live from the conference!
Tonight, many of the designers who created the Crochet Belts from the Hip book together, including myself, will be on the show tonight getting all loopy about designing.
If you've already downloaded your raw, uncensored copy of the book, you'll know what I mean when I say, "Join us at the designer's table tonight" from 9-10pm while we're live. (If you can't make it, it will be archived and accessible immediately after the show.)

Tuesday, July 29, 2008

This CGOA Conference Broke the Mold!!

Have returned from Manchester NH to report that Chain Link 2008 (a.k.a. Knit and Crochet Show) was like no other conference ever!

pictured: Yvonne Tate (bklynvonne) handing out Ravelry buttons

Here's a list of firsts:
- CGOA's Design Contest was a great success! 115 high caliber entries means oh yes, we'll be doing this again. Thanks to Treva McCain for all of her hard work to make it happen.
- We had a record number of door prizes. For PD Day alone, every attendee (about 145) won at least 1 door prize. PD Day was the best ever so I'll have to blog more about that. (Pictured: Myra Wood and Jennifer Hansen in foreground; behind them, Robyn Chachula, presenters Jean Leinhauser and Rita Weiss, and at the podium, Jane Schwartz and Drew Emborsky.)

- In addition to creating this year's PD Day, Drew took over the job of emceeing the fashion show from the illustrious Lily Chin this year. (Drew, your Italian bespoke emcee jacket was spectacular.) He did a wonderful job, which freed up Lily to do some fabulous modeling on the runway.

- New 30-minute afternoon fashion show in the Market--therefore Drew's managing and emceeing of it is an automatic first, plus, Tammy Hildebrand agreed to model!

- Another fashion show first is the pre-show training generously provided by ex-model Melanie Mays. Another first I guess is that I didn't enter any of my own designs in the fashion show(s) this time. I modeled other people's, such as Annette Stewart's fun flouncy miniskirt (a contest entry).
- One other fashion show first is the way everyone just cleared out after the show on Saturday night. We didn't even have our usual post-show design lab!
- New CGOA Director Lorraine Lucas is a guild member-at-large, so the hobbyist members who are not in the business of selling yarn or designs now have a representative on the board. I found out that Lorraine is just the person you want to spend hours in a coffeehouse with before getting drenched by torrential rains on the way back to the conference. Wish I had a photo of that.

- Some other first-time attendees besides Lorraine: Carrie Sullivan, Amy Shelton (Crochetville admin), Renee Barnes (CrochetRenee'), Kimberly McAlindin, Jerry Rigdon, Jack Blumenthal, and Jess and Casey of Ravelry. New-to-me at the conference were Kim Guzman, Kristen TenDyke, and Gloria Tracy! New-to-many (but a sweet reunion for me) was Jenny King! In fact, we had the highest number of pre-registered attendees ever.

- We added a Committee Meet & Greet to the Members' Annual Meeting, and many chairpersons instantly found new volunteers for their committee this way.

- The Thursday night Market preview was hoppin'!! I think it was a good move to have Mary Beth Temple doing her live Getting Loopy podcast from the show floor right at the entrance so that no one could miss it. Her daughter "LL" was the perfect assistant. I want to thank the dozens of attendees who were happy to call in to the podcast and talk with MBT for a few minutes. They were less shy than I was! I'm told it made for a record download.

Read about the conference at these blogs:
I especially enjoyed the conference entries at Fire Lizard Studios, which is a blog I haven't seen before.

Saturday, July 19, 2008

Our New Designer-Published Book


Before I leave for the big exciting national CGOA conference thatIwouldn'tmissfortheworld I'm proud to officially announce a new kind of crochet pattern book.

NINETEEN designers rode the publishing rapids together and survived the adventure! We've learned what it's like to put together an instant-download e-book as a group, get a website for it, get it reviewed, and choose the topic for our next one. Many of us will meet up again at the conference this week so who knows what will come of that!

We call our group "Straight From Today's Designers", or SFTDonline.com.

For the book I did a "Barbed Wire Belt" in silver Jelly Yarn. I was able to include a story about the design because I'm one of the publishers. Feels good!

Don't miss Tammy Hildebrand's daughter modeling her belt!


JD Wolfe of Craft Gossip reviewed it here and Lime & Violet reviewed it here. So far, these contributors have blogged it: Angela Best of La Vonne's Knot Just Knits, Doris Chan, Robyn Chachula, Noreen Crone Findlay, Lisa Gentry, Pam Gillette of Knotty Generation, Kim Guzman of Kimane Designs, Amie Hirtes of Nexstitch,Margaret Hubert, and Marty Miller.